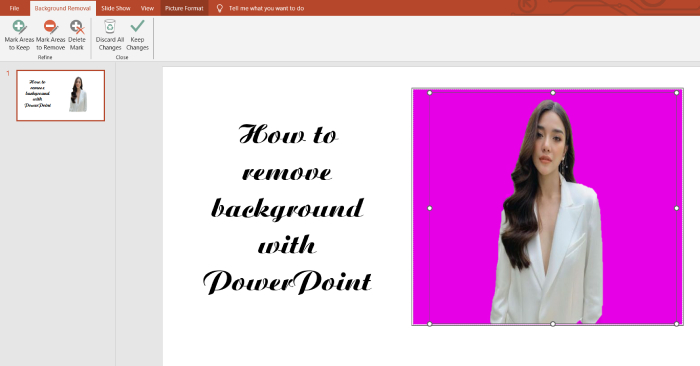
Though there are many tools out there that can help to remove background from pictures in seconds, people who are creating a presentation on PowerPoint want to do it directly on the software. If you are questioning how to remove background in PowerPoint, this blog is for you. Find out 3 easy steps to get background removal done right on PP with our pictorial tutorial.
How does the background removal work in PowerPoint?
Microsoft PowerPoint is a popular presentation software that has a convenient and user-friendly built-in feature to remove background from photos. The artificial intelligence-powered background eraser in PowerPoint is a useful feature that allows users to easily improve the visual impact of their presentations. However, this tool is not always flawless and will almost certainly necessitate the use of some manual approaches.
How to remove background in PowerPoint automatically?
Step 1: Inserting the picture

To remove the background of a picture in PowerPoint, first of all, you have to insert your picture into the slide. Here is how to do it:
- Open PowerPoint on your computer and navigate to the slide where you want to insert the image.
- In the ribbon, select the “Insert” tab.
- Select the picture you want to insert by clicking the “Pictures” button.
Step 2: Use the remove background feature in PowerPoint

After inserting the image, use the backdrop Removal tool to delete the background. Follow these detailed below steps to accomplish this:
- To select a photo, click on it.
- In the ribbon, select the “Picture Tools Format” tab.
- Select the “Remove Background” option.
PowerPoint will automatically determine the image’s main subject and remove the background. And that’s how you can make an image background transparent in powerpoint easily.
However, sometimes the built-in PowerPoint tool cannot perfectly remove background from image. Then you will have to make some manual adjustments.
4 tips for flawless background removal in Powerpoint
- Use high-quality photos that clearly distinguish the topic from the background.
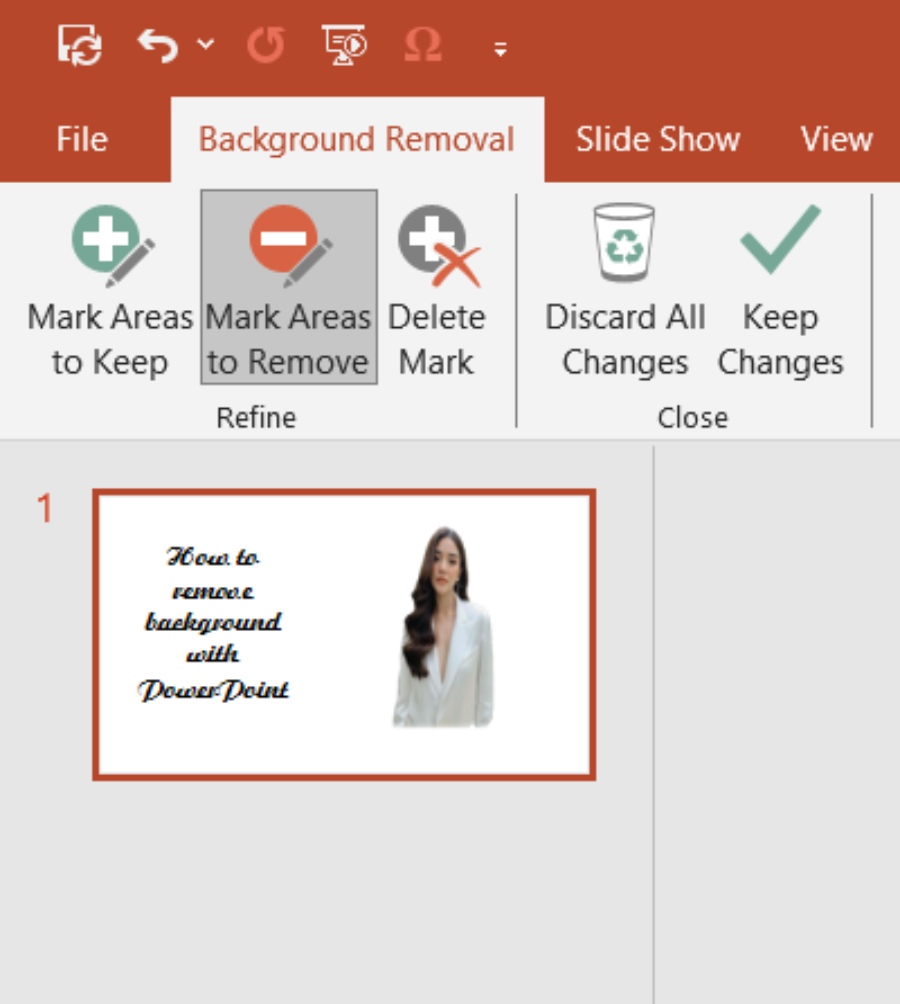
- To manually change the selection, use the “Mark Areas to Keep” and “Mark Areas to Remove” options.
- To remove a specific color from an image, use the “Set Transparent Color” option.
- To preview how the final product will look, click the “Preview” button.
How to manually remove background from a picture in PowerPoint

If the automatic tool for removing backgrounds didn’t give you the result you wanted, you have the option to make manual adjustments using the “Mark Areas to Keep” and “Mark Areas to Remove” tools. Here’s the instructions to do it:
- Click on either the “Mark Areas to Keep” or “Mark Areas to Remove” button.
- Use your mouse to draw lines around the parts you want to keep or get rid of.
- If you make any accidental marks, use the “Delete Mark” button to remove them.
Changing the Size and Shape of the Selection
You can modify the size and shape of the selected area by dragging the handles on the selection box. You can also rotate the selection by clicking and dragging the rotation handle.
After you have finished editing your picture, to get a glimpse of how the final result will appear, click the “Preview” button. This will show you the image with the background removed. If you’re satisfied with how it looks, click “Keep Changes” to apply the modifications.
PowerPoint also provides an application on your smartphone, but it’s a little bit difficult to use.
If you want to remove the background easily on your smartphone, for example on an iPhone, you can discover how to remove background with iPhone. With those instructions, you can easily remove background without downloading the PowerPoint application.
How to remove background in powerpoint 2007
Removing background in PowerPoint 2007 is a bit different. If you are using this version, follow the steps below:
Step 1: Insert your picture to the slide
Step 2: Select the picture > Choose Format on the menu > Choose Recolor
At the bottom of the dropdown, you choose Set Transparent color
Step 3: Click your mouse on the background you want to remove and you get a new transparent one.
Why removing background of a picture is important?

The background of a photo plays an important role in how the photo will look. It may or may not be beautiful, depending on many parts of your background. Lighting, composition, and landscape will greatly affect whether your photo will look harmonious and balanced, confused, or not suitable for the subject. Besides, the background of the photo will also depend on the style you shoot to be able to focus on the main subject of the photo. It can be a portrait, artwork, or even a card photo. Therefore, many users will use background removal tools to remove background so that they can add a new background or will take the photo with the background removed for a number of different purposes.
Conclusion
In this detailed guide, we have helped you answered how to remove background in PowerPoint, specifically focusing on erasing picture backgrounds. We’ve covered the basics, provided a step-by-step walkthrough, and explored advanced techniques. By following these pointers, you can easily remove background from any image in PowerPoint, giving your presentations a professional touch. For more insights into mastering image editing in PowerPoint, be sure to check out resources like Fotor AI Background Remover and other online guides.
Last updated by: admin on 03:26 - 09/10/2024


